
Help
Help - Installation and user manual for Shadow Analysis
Shadow Analysis was created in such way, to allow using it as simple, as it is possible. Basing on our users opinions we have developed aplication interface to meet their demands and make work with it fast and seamlessly.
Table of contents:
1. Shadow Analysis installation
1.1. Shadow Analysis 2
For your convenience we created video tutorial/walkaround. If you prefer traditional text & screenshot manual you can find it below.
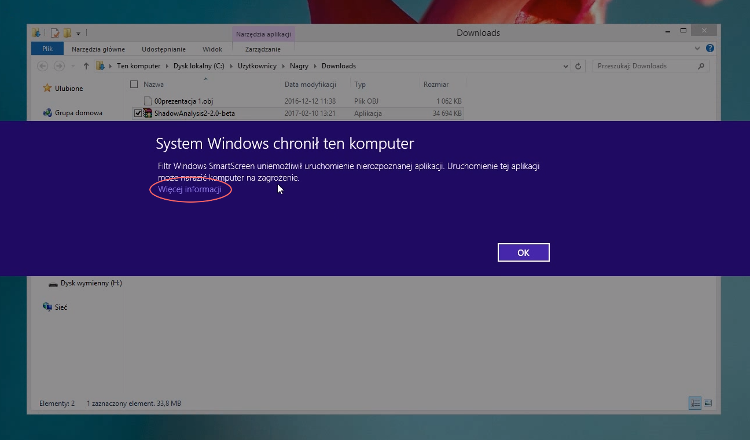
Shadow Analysis 2 is a standalone windows application. After download just double click on the file. Warning message form Windows Smart Screen may appere on the screen. Click 'More information' and 'Run anyway'.
In installer window you can choose target directory where Shadow Analysis will be extracted to. If the location is correct click Extract button to start.

1.2. Shadow Analysis for SketchUp 2013 - 2017
Shadow Analysis 2013 installation in SketchUp 2013 software easily can be done by using built-in extensions installator. It is available in tab of Settings, which you can turn on by choosing in menu Window -> Preferences (SketchUp -> Preferences in Mac OS X).

In tab of settings you should go to tab Extensions and next - click Install Extension button. After choosing ShadowAnalysis2013.rbz or ShadowAnalysis2013PL.rbz pack, plugin will be installed and it will be prepare to work.

1.3. Shadow Analysis for SketchUp 6 - 8 in Windows
0. Demands and system preparation
For proper installation of Shadow Analysis it is required installation of Google SketchUp in version 7 or up. It is important to run and close Google SketchUp at least once, before Shadow Analysis intallation.
1. Unzip the installation pack
After downloand ShadowAnalysisInstaller.zip file on your disc, unzip pack in convenient for you location.
2. Start the installer and choose language
Run ShadowAnalysis.exe file and choose installation language from the list.

3. Accept license agreement to proceed

4. Choosing a location, where Shadow Analysis will be installed
Installator skan operational system in searching of active Google SketchUp installations and propose one of them. If you would like to install Shadow Analysis for other Google SketchUp installation - change proposal path.

5. Moving files takes usually less than 1 second.

6. License registration (optional)
If you have license code make sure, that you have active connection to internet and fill registration form.

If registration was successfully, you will be informed about that fact. If it occurs problem with connecting to the server, check your link and try again. If this error will repeat - contact with us.
1.4. Shadow Analysis for SketchUp 6 - 8 in Mac OS X
0. Demands and system preparation
For proper installation of Shadow Analysis it is required installation of Google SketchUp in version 7 or up. It is important to run and close Google SketchUp at least once, before Shadow Analysis intallation.
1. Unzip installation pack
Plugin istallation involves placing aplication files in right folder. Usually it will be folder:
/Library/Applications Support/Google SketchUp x/SketchUp/plugins
where in place of 'x' letter you should place number of yours Google SketchUp version.
Proper installation path you can check by using Ruby console:
1.1 Start SketchUp
1.2 From menu pick Window -> Ruby Console
1.3 In command line write command:
Sketchup.find_support_file("plugins")
and accept it by pressing Enter button. In console should show statement with proper path of plugin installation.

Shadow Analysis installation archives should be unzip in plugins folder. After proper installation in target folder should be placed file ShadowAnalysisLoader.rb and catalog Shadow Analysis for Sketchup.

2. Restart SketchUp
To let Shadow Analysis create proper entries in SketchUp menu, it should be restarted. From menu pick Sketchup -> Quit SketchUp.

When you turn on SketchUp again, on menu bar should be placed shortcut to Plugins and inside of it - ShadowAnalysis.

2. Using Shadow Analysis
2.1. Shadow Analysis 2
For your convenience we created video tutorial/walkaround. You can find it above.
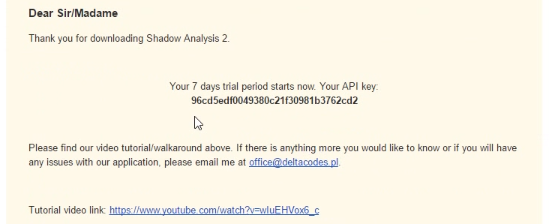
1. First start
On first start you have to register your API key. You can find it in the e-mail you have recived after downloading Shadow Analysis 2.
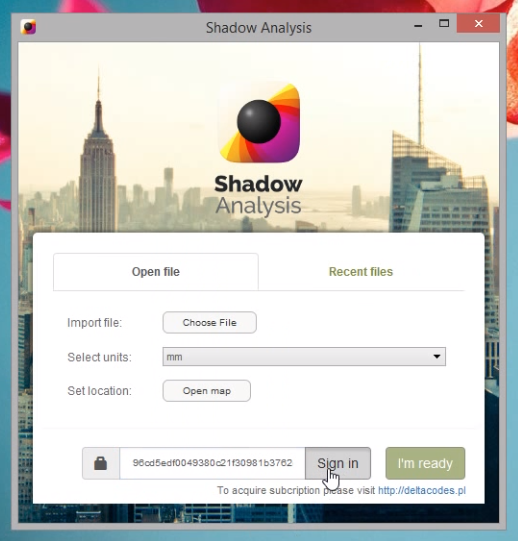
2. Importing model
To import 3d model click Choose file button. It is important to always use triangulation when exporting 3d model for use in Shadow Analysis 2.
After selecing the file you shoud specify units in which model was created. This setting have impact of scale and size of your 3d scene. But don't worry, you can change units at any time by clicking Import button ![]() form menu. Also, application will notify you if it detecs a stange scene size.
form menu. Also, application will notify you if it detecs a stange scene size.
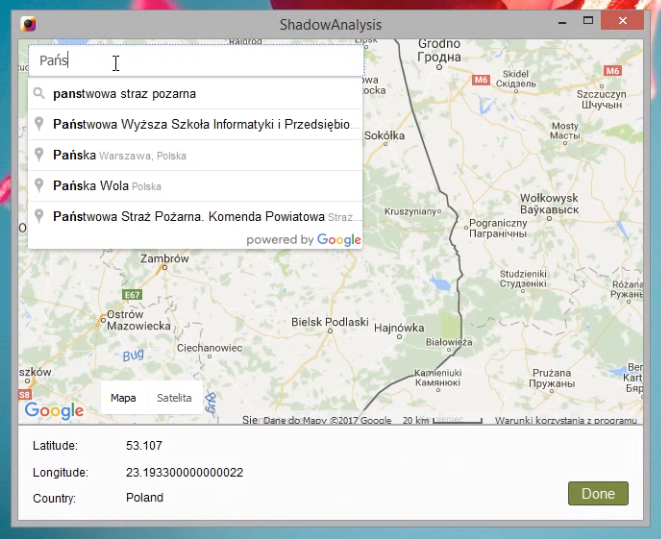
The last step is to set location. To do this, just click Open map button and point on to desired location. In map window you can use search bar. Click Done button when you ready to save location information.
3. Menu buttons

Help & Credits
Import model/Open saved scene
Save scene
Set location
Start analysis
Save report
Exit
4. Mouse functions and scene navigation
| Left Button | Scroll Wheel | Right Button |
|---|---|---|
| Click: Selecting object Click & drag: Box selection |
Click & drag: Rotating Camera Scroll forward: Zoom in Scroll backward: Zoom out |
Click & drag: Moving Camera |
5. Performing analysis
To open Calculate shadow window click Start analysis button ![]() from menu.
from menu.
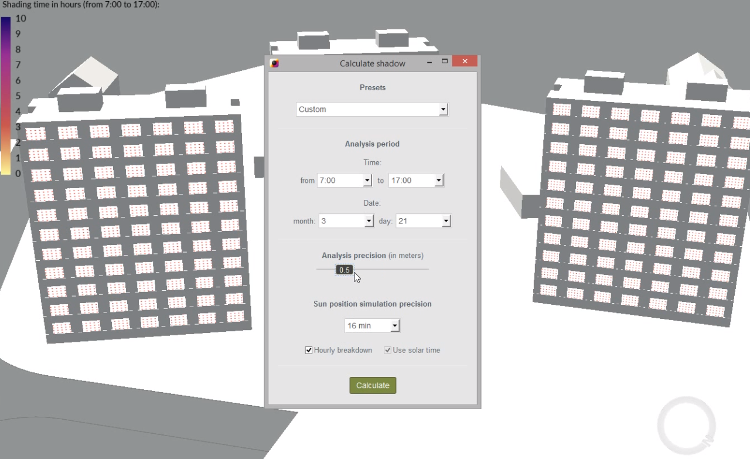
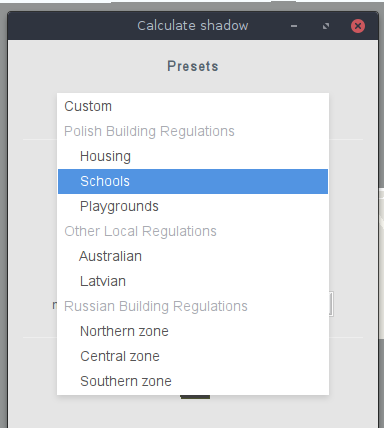
Options in calculate window are divided to 3 settings groups. First of them is called Presets. Presets allow you to choose one of available predefined settings for local building regulations.
This settings affect period of the analysis. Depending on the setting, some of controls in Analysis period my be disabled.
In Analysis period you can specify day and time of analysis.
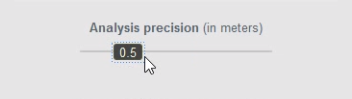
In the last settings group we combined settings responsible for precision and legend. By modifing value of Analysis precision you alter the distance between points used to shadow calculation. Those points are displayed on surfaces seleted for analysis. Analysis precision has the greatest impact on the computation time.
Sun position simulation precision determines the accuracy of sun position simulation. For exaple if you choose 4min, Shadow Analysis will calculate sun position for every 4 minutes betwen selected start and end hour.
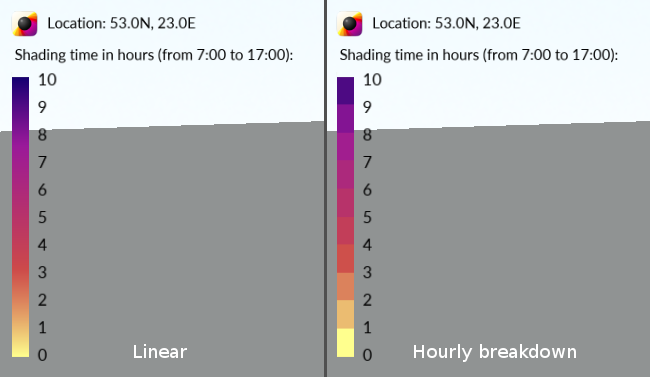
Hourly breakdow allow you to switch between two modes of displaing results. If you enable Hourly breakdown you will see sharp divisions between colors representing each period of shading time (one hour in most cases). If you disable this option, you will get linear color transitions. This means that each shading time value is being used to calculate the corresponding color.
6. Saving reports
To save report click Save report button ![]() from menu.
from menu.
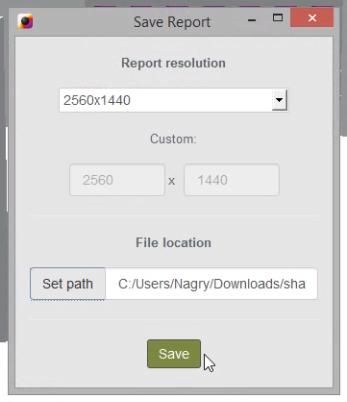
In Save Report window you can adjust report resolution and set path where report file will be saved to.
2.2. Shadow Analysis for SketchUp
1. Running
Shadow Analysis aplication after it correct installation you can find in yours Plugins menu of your Google SketchUp software version.

uruchamianie programu Shadow Analysis
2. Options
One of main benefits from our software is possibility to adjustment analysis settings to specyfic needs.
Basic analysis parameter is resolution. From resolution depends, how long will takes preparing analysis result. For test analysis it is worth to use lower settings.

analysis resolution settings
Predefined settings allows for fast adjust analysis options for specyfic needs. Available variants were prepared according to construction law regulations. In English version there are available following settings:
- standard,
- Australian building regulations,
- Latvian building regulations,
- Russian building regulations.

predefined settings
Measurements precision determines, at how many minutes should be made lighting simulation for analysis needs. With lower values, analysis result will be more precise. Increasing precision takes more time needed for calculations.

adjustment of analysis precision
3. Results
Results of shading analysis are presented in the form of colored graph. Aplication after calculation end will ask you for indication of place, where you want save results file.

zapisywanie wyniku


